

Es begab sich zu einer Zeit, da erweiterte sich mein Besitzimperium um ein weiteres Meisterstück der Technik: Der Arduino sagte “Hello World!”. Mit dieser kleinen Bastlerei nahm alles seinen Anfang und ich hatte Ideen über Ideen, was man da alles tolles basteln könnte.
Aber ohne Netz? Ohne Internet? Laaaangweilig. Also musste erst einmal das passende Erweiterungmodul her: Das Arduino Ethernet Shield - LAN-Anschluss 100 MBit. Sollte erst einmal reichen:
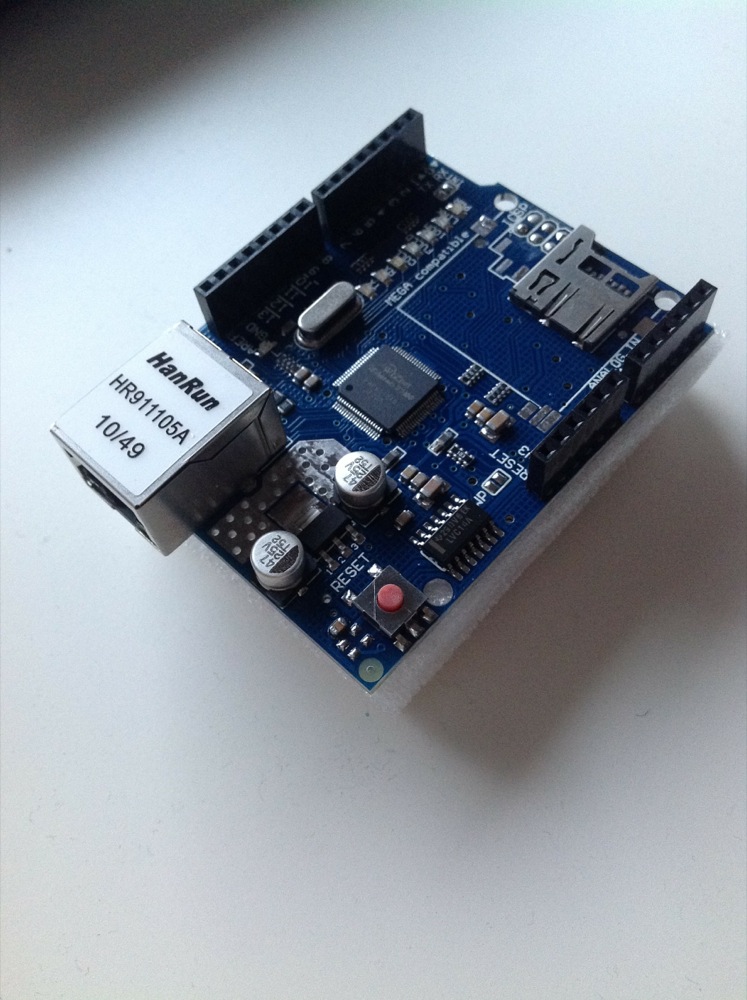
Dieses Modul kann man dann oben auf den Arduino stecken und hat dann so einen süßen kleinen Doppeldecker mit Netzanschluss. Wunderbar es konnte losgehen!

Der Plan: Eine Art Wunderlampe, die in verschiedenen Farben leuchten kann. LEDs in verschiedenen Farben gibt es ja genug und die elektrische Verschaltung davon ist nicht sonderlich kompliziert. Was noch fehlte? Eine Art Lampion, der das Licht der LEDs schön verteilt. Ich habe dann einfach so eine alte 100er CD-RW Spule ausgegraben und Butterbrotpapier drum herum geklebt. Funktioniert wunderbar!

Aber nur eine leuchtende Lampe? Nun ja, da ist ja noch das gute, alte Internet, das ich da etwas integrieren wollte.
Es gibt da einige Beispiele, die direkt vom Arduino-Softwarepaket mitgeliefert werden. Darunter auch Twitter \o/
Hier der Teil des Codes, der den Request an die Twitter API macht:
void connectToServer() {
  // attempt to connect, and wait a millisecond:
  Serial.println("connecting to server...");
  if (client.connect(serverName, 80)) {
    Serial.println("making HTTP request...");
    // make HTTP GET request to twitter:
    client.println("GET /1/statuses/user_timeline.xml?screen_name=i42n&count=1 HTTP/1.1");
    client.println("HOST: api.twitter.com");
    client.println();
  }
  // note the time of this connect attempt:
  lastAttemptTime = millis();
}
Dabei wird der letzte Tweet eines Nutzers abgerufen. In diesem Fall von i42n. Die relevante Zeile ist dabei diese hier:
GET /1/statuses/user_timeline.xml?screen_name=i42n&count=1 HTTP/1.1
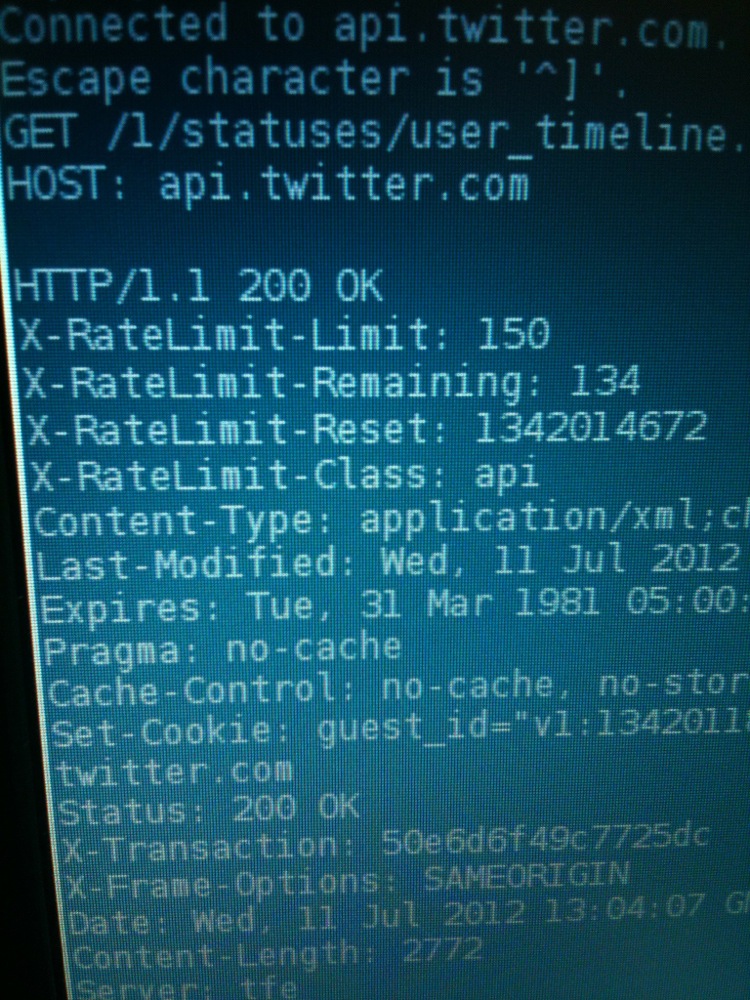
Was die Twitter Server bei diesem GET Request tatsächlich zurückliefern lässt sich via telnet am bequemsten austesten:
[stefan@ws-st]$ telnet api.twitter.com 80
Trying 199.59.148.87...
Connected to api.twitter.com.
Escape character is '^]'.
GET /1/statuses/user_timeline.xml?screen_name=i42n&count=1 HTTP/1.1
HOST: api.twitter.com
HTTP/1.1 200 OK
X-RateLimit-Limit: 150
X-RateLimit-Remaining: 149
X-RateLimit-Reset: 1342468845
X-RateLimit-Class: api
Content-Type: application/xml;charset=utf-8
Last-Modified: Mon, 16 Jul 2012 19:00:45 GMT
Expires: Tue, 31 Mar 1981 05:00:00 GMT
Pragma: no-cache
Cache-Control: no-cache, no-store, must-revalidate, pre-check=0, post-check=0
Set-Cookie: guest_id="v1:134246524581592820";Expires=Wed, 16-Jul-14 19:00:45 GMT;Path=/;Domain=.twitter.com
Status: 200 OK
X-Transaction: bc8b717beb2512df
X-Frame-Options: SAMEORIGIN
Date: Mon, 16 Jul 2012 19:00:45 GMT
Content-Length: 2832
Server: tfe
<?xml version="1.0" encoding="UTF-8"?>
<statuses type="array">
<status>
<created_at>Mon Jul 16 09:41:33 +0000 2012</created_at>
<id>224800932951638016</id>
<text>@DLR_next Danke! Daraus erklärt sich auch, warum man das richtig vorhersagen kann.</text>
<source><a href="http://www.echofon.com/" rel="nofollow">Echofon</a></source>
<truncated>false</truncated>
<in_reply_to_status_id>224800653598392320</in_reply_to_status_id>
<in_reply_to_user_id>69248730</in_reply_to_user_id>
<in_reply_to_screen_name>DLR_next</in_reply_to_screen_name>
<user>
<id>22298116</id>
<name>i42n</name>
<screen_name>i42n</screen_name>
<location></location>
<description>Void - And Everything Between</description>
<profile_image_url>http://a0.twimg.com/profile_images/1683777427/avatar_normal.png</profile_image_url>
<profile_image_url_https>https://si0.twimg.com/profile_images/1683777427/avatar_normal.png</profile_image_url_https>
<url>http://www.funkenstrahlen.de</url>
<protected>false</protected>
<followers_count>155</followers_count>
<profile_background_color>022330</profile_background_color>
<profile_text_color>333333</profile_text_color>
<profile_link_color>0084B4</profile_link_color>
<profile_sidebar_fill_color>C0DFEC</profile_sidebar_fill_color>
<profile_sidebar_border_color>A8C7F7</profile_sidebar_border_color>
<friends_count>551</friends_count>
<created_at>Sat Feb 28 21:34:23 +0000 2009</created_at>
<favourites_count>20</favourites_count>
<utc_offset>3600</utc_offset>
<time_zone>Berlin</time_zone>
<profile_background_image_url>http://a0.twimg.com/images/themes/theme15/bg.png</profile_background_image_url>
<profile_background_image_url_https>https://si0.twimg.com/images/themes/theme15/bg.png</profile_background_image_url_https>
<profile_background_tile>false</profile_background_tile>
<profile_use_background_image>true</profile_use_background_image>
<geo_enabled>false</geo_enabled>
<verified>false</verified>
<statuses_count>5465</statuses_count>
<lang>de</lang>
<contributors_enabled>false</contributors_enabled>
<is_translator>false</is_translator>
<listed_count>6</listed_count>
<show_all_inline_media>false</show_all_inline_media>
<default_profile>false</default_profile>
<default_profile_image>false</default_profile_image>
<following></following>
<follow_request_sent></follow_request_sent>
<notifications></notifications>
</user>
<geo/>
<coordinates/>
<place/>
<contributors/>
<retweet_count>0</retweet_count>
<favorited>false</favorited>
<retweeted>false</retweeted>
</status>
</statuses>
Connection closed by foreign host.
[stefan@ws-st]$
Diese Daten kann man dann direkt auf dem Arduino empfangen, auswerten und dann irgendetwas damit anstellen. Dazu aber später mehr…
Ich wollte es nämlich nicht dabei belassen meine eigenen Tweets in irgendeiner Art und Weise zu verarbeiten - denn was ich schreibe bietet keinerlei Überraschungseffekt.
Daher kam die Idee auf die Twitter Search API anzuzapfen und auf Tweets mit einem bestimmten Hashtag zu reagieren. Die Spezifikation der API findet sich direkt bei Twitter.
Nach ein wenig Testerei bin ich bei folgendem Request gelandet:
GET /search.json?q=%23color&rpp=1&include_entities=false&result_type=recent HTTP/1.1
HOST: search.twitter.com
Die Suche setzt sich wie folgt zusammen:
- suche nach dem Hashtag #color - das ist das %23color
- nur einen Tweet als Ergebnis - das ist das rpp=1
- zusätzliche Daten interessieren mich nicht (möchte nur den Tweet) - daher das include_entities=false
- ich möchte nur den aktuellsten Tweet sehen - daher result_typ=recent
Wichtig hier noch: Hier ist der HOST nicht mehr api.twitter.com, sondern search.twitter.com!
Wir erhalten feinstes JSON:
[stefan@ws-st]$ telnet api.twitter.com 80
Trying 199.59.148.87...
Connected to api.twitter.com.
Escape character is '^]'.
GET /search.json?q=%23arduino&rpp=1&include_entities=false&result_type=recent HTTP/1.1
HOST: search.twitter.com

HTTP/1.1 200 OK
Cache-Control: max-age=15, must-revalidate, max-age=300
Expires: Mon, 16 Jul 2012 19:12:41 GMT
Content-Type: application/json;charset=utf-8
X-Transaction: 28c46296d38d161f
X-Frame-Options: SAMEORIGIN
Content-Length: 1260
Vary: Accept-Encoding
Date: Mon, 16 Jul 2012 19:07:41 GMT
X-Varnish: 1278502795
Age: 0
Via: 1.1 varnish
Server: tfe
Connection: close

{"completed_in":0.088,"max_id":224942720534319104,"max_id_str":"224942720534319104","next_page":"?page=2&max_id=224942720534319104&q=%23arduino&rpp=1&result_type=recent","page":1,"query":"%23arduino","refresh_url":"?since_id=224942720534319104&q=%23arduino&result_type=recent","results":[{"created_at":"Mon, 16 Jul 2012 19:04:58 +0000","from_user":"dave_chatting","from_user_id":5582372,"from_user_id_str":"5582372","from_user_name":"David Chatting","geo":null,"id":224942720534319104,"id_str":"224942720534319104","iso_language_code":"en","metadata":{"result_type":"recent"},"profile_image_url":"http:\/\/a0.twimg.com\/profile_images\/1343930286\/200153_5327987125_645872125_72224_4847_n_normal.jpg","profile_image_url_https":"https:\/\/si0.twimg.com\/profile_images\/1343930286\/200153_5327987125_645872125_72224_4847_n_normal.jpg","source":"<a href="http:\/\/itunes.apple.com\/us\/app\/twitter\/id409789998?mt=12" rel="nofollow">Twitter for Mac<\/a>","text":"\u201c@OpenIDEO: Catch the latest on prototyping, design + building in @IDEO Labs http:\/\/t.co\/uKhL6Sad\u201d #bluetooth40 #arduino #ios","to_user":null,"to_user_id":0,"to_user_id_str":"0","to_user_name":null}],"results_per_page":1,"since_id":0,"since_id_str":"0"}
Connection closed by foreign host.
[stefan@ws-st ]$
Diese (auf dem Rechner) ausprobierte Query, wird nun in den Arduino-Code integriert:
/*
 * connect to twitter api server and send a GET request
 */
void connectToServer() {
  // attempt to connect, and wait a millisecond:
  Serial.println("connecting to server...");
  if (client.connect(serverName, 80)) {
    Serial.println("making HTTP request...");
    // make HTTP GET request to twitter:
    // this is the important request to receive the correct data in json format from twitter api
    client.println("GET /search.json?q=%23color&rpp=1&include_entities=false&result_type=recent HTTP/1.1");
    client.println("HOST: search.twitter.com");
    client.println();
  }
  // note the time of this connect attempt:
  lastAttemptTime = millis();
}
Ob der Ardunio eine Antwort vom Server bekommt, testen wir mit folgendem Code:
void loop() {
  if (client.connected()) {
    if (client.available()) {
      // read incoming bytes:
      char inChar = client.read();
      // send the received data to the debug console
      Serial.print(inChar);
    }
  }
  else if (millis() - lastAttemptTime > requestInterval) {
    // if you're not connected, and request interval has passed since
    // your last connection, then attempt to connect again:
    connectToServer();
  }
}
Wir können so in der Debugging Konsole genau sehen, welche Daten der Ardunio empfängt. Das sollte sich im Wesentlichen mit dem decken, was wir zuvor am Rechner mit telnet probiert haben. Mein Arduino spuckt das hier aus:
Attempting to get an IP address using DHCP:
My address:192.168.178.51
connecting to server...
making HTTP request...
HTTP/1.1 200 OK
Cache-Control: max-age=15, must-revalidate, max-age=300
Expires: Tue, 17 Jul 2012 10:47:46 GMT
Content-Type: application/json;charset=utf-8
X-Transaction: 3542474c9fae57d1
X-Frame-Options: SAMEORIGIN
Content-Length: 1100
Vary: Accept-Encoding
Date: Tue, 17 Jul 2012 10:42:46 GMT
X-Varnish: 1712493073
Age: 0
Via: 1.1 varnish
Server: tfe
Connection: close

{"completed_in":0.479,"max_id":225178462078517248,"max_id_str":"225178462078517248","next_page":"?page=2&max_id=225178462078517248&q=%23color&rpp=1&result_type=recent","page":1,"query":"%23color","refresh_url":"?since_id=225178462078517248&q=%23color&result_type=recent","results":[{"created_at":"Tue, 17 Jul 2012 10:41:43 +0000","from_user":"desktop_world","from_user_id":34401830,"from_user_id_str":"34401830","from_user_name":"desktop-world","geo":null,"id":225178462078517248,"id_str":"225178462078517248","iso_language_code":"sv","metadata":{"result_type":"recent"},"profile_image_url":"http:\/\/a0.twimg.com\/profile_images\/156121819\/logo_2_normal.jpg","profile_image_url_https":"https:\/\/si0.twimg.com\/profile_images\/156121819\/logo_2_normal.jpg","source":"<a href="http:\/\/desktop-world.info" rel="nofollow">Desktop World<\/a>","text":"New post: \u200b\u200bCity http:\/\/t.co\/7OWh4NmI #3D #color #Wallpaper #\u200b\u200bCity","to_user":null,"to_user_id":0,"to_user_id_str":"0","to_user_name":null}],"results_per_page":1,"since_id":0,"since_id_str":"0"}
Gut, wir können nun also Daten empfangen. Es wird Zeit, dass wir uns um die Beleuchtung kümmern. Die Verschaltung ist relativ simpel: So viele LEDs wie möglich (soll ja hell sein) parallel geschalten. (Die LEDs, die hier weiß aussehen, leuchten blau)

Jede Farbe wird dann einzeln vom Arduino angesteuert:

So weit so gut. Jetzt müssen wir nur noch aus dem JSON, das uns die Twitter Server liefern den Tweet extrahieren und dort dann nach einer Farbe suchen, die wir darstellen können. In der einfachsten Form sind das direkt die Farben der LEDs selbst: rot, grün, gelb und blau.
Ich habe hierfür mehrere Möglichkeiten in Betracht gezogen. Die kompliziertere Variante: Das JSON zwischenspeichern und einen Parser vor die Füße werfen. Das braucht aber viel Speicher und ist langsam. Daher parse ich die Daten direkt während sie empfangen werden.
void loop() {
  if (client.connected()) {
    if (client.available()) {

      // read incoming bytes:
      char inChar = client.read();
      //Serial.print(inChar);
      currentLine += inChar;

      // check if the currently cached data from server contains the json element "text"
      // we are interested in this element as it contains the tweet we are looking for
      if(currentLine.indexOf("\"text\":\"") > -1) {
        textFound = true; // "text" element was found in json from server
      }

      // check if currently cached data contains the "text" tag AND if we have already received the whole tweet message
      if(currentLine.endsWith("\",") && textFound) {
        // we received the whole tweet \o/

        // cut off the "text": at the beginning and the ", at the end
        currentLine = currentLine.substring(8, currentLine.length() - 2);

        Serial.println("");
        Serial.println("##################");
        Serial.println(currentLine);
        Serial.println("##################");
        setColorFromTweet(currentLine);
        client.stop(); // we received what we were interested in, so close the connection
        currentLine = ""; // clear data
        textFound = false; // reset triggers
        Serial.print("Will sleep now for "); Serial.print(requestInterval / 1000); Serial.println(" seconds.");
      }

      // if current cached data line does not contain "text" and a "," ist read, delete the cached data
      // this is when a json data field was read, that does not equal the "text" data field
      if(inChar == ',' && !textFound) {
        currentLine = "";
      }

    }
  }
  else if (millis() - lastAttemptTime > requestInterval) {
    // if you're not connected, and two minutes have passed since
    // your last connection, then attempt to connect again:
    connectToServer();
  }
}
Ich denke ich muss dazu nicht mehr viel schreiben - die Dokumentation der Codezeilen ist ausführlich genug. Sobald ein Tweet empfangen wurde, wird setColorFromTweet() aufgerufen. In der einfachsten Form schaut das dann so aus:
void setColorFromTweet(String currentLine) {
  Serial.println("Trying to extract colors from tweet...");
  currentLine.toLowerCase();

  if(currentLine.indexOf("green") > -1) {
    Serial.println("Found green.");
    analogWrite(ledGreen, 255);
  } else {
    analogWrite(ledGreen, 0);
  }

  if(currentLine.indexOf("red") > -1) {
    Serial.println("Found red.");
    analogWrite(ledRed, 255);
  } else {
    analogWrite(ledRed, 0);
  }

  if(currentLine.indexOf("yellow") > -1) {
    Serial.println("Found yellow.");
    analogWrite(ledYellow, 255);
  }  else {
    analogWrite(ledYellow, 0);
  }

  if(currentLine.indexOf("blue") > -1) {
    Serial.println("Found blue.");
    analogWrite(ledBlue, 255);
  }  else {
    analogWrite(ledBlue, 0);
  }
}
Wir können damit die vier Grundfarben der LEDs erkennen und dann entsprechend anschalten.

Der Tweet: “I like the #color red and blue” führt dann zu diesem Ergebnis:


Schaut ganz nett aus, wie ich finde :)
Den kompletten Code gibt es als Github Projekt! Natürlich mit einem Namen, direkt aus dem Hause IKEA - Meine Lampe heißt l3na. Falls euch das Projekt gefällt, schreibt doch mal einen Tweet mit dem Hastag #l3na und eurer Lieblingsfarbe. Ich freue mich wenn l3na dann durch euch leuchtet :)
Und jetzt: Viel Spaß beim selber basteln und spielen!
PS: Wenn ihr öfter solche Artikel lesen wollt, dann lasst hier einfach mal einen begeisterten Kommentar fallen ;) Vielleicht mache ich mir dann die Arbeit, zukünftige Projekte hier genauso zu dokumentieren…